
 Download App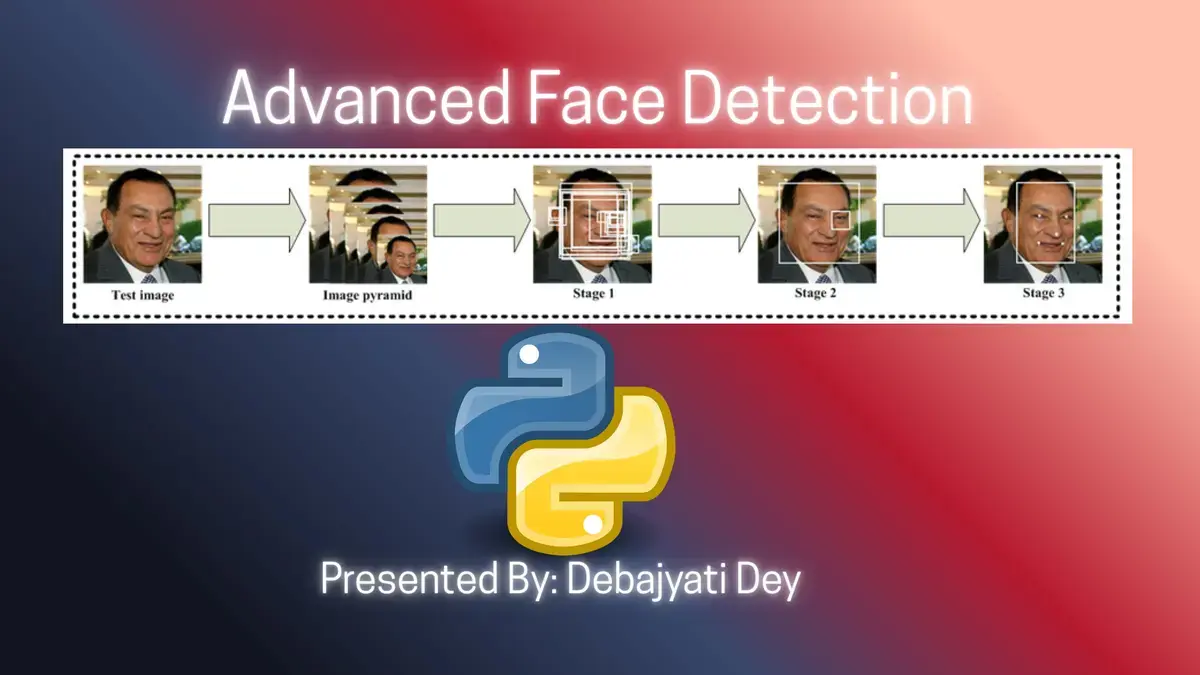
If you have read my last article, Face Detection in Python Using OpenCV, -
You have already known the Haar Cascade Method of OpenCV for Face and Eye Detection and how easy is it to use. I have also discussed the potential pitfalls of Haar Cascade method in that article and mentioned deep learning based detectors as the better alternatives.
In this article we are going to see, how to use MTCNN, a popular and powerful, deep learning based, Face Detection Method, to detect faces. Below, I have shown you the overall pipeline and internal architecture of MTCNN through an image. [The image is collected from The Documentation of the mtcnn library, an implementation of the original MTCNN algorithm to be used with TensorFlow]
WHAT IS MTCNN?
MTCNN (Multi-task Cascaded Convolutional Networks) is a fast, accurate face detection and alignment system that uses three cascaded CNNs to detect faces and locate 5 facial landmarks (eyes, nose, mouth corners) in real time — ideal for “in-the-wild” images.
HOW DOES MTCNN WORK?
MTCNN works in three cascaded stages: (look at the image above)
P-Net (Proposal Network) :– Scans the image at multiple scales to generate candidate face regions and rough bounding boxes.
R-Net (Refinement Network) :– Filters out false positives from P-Net and refines bounding box coordinates for better accuracy.
O-Net (Output Network) :– Further refines bounding boxes and outputs 5 facial landmarks (eyes, nose, mouth corners) for face alignment.
Each stage progressively improves detection accuracy and reduces false positives, while jointly optimizing face detection, bounding box regression, and facial landmark localization — hence “multitask.” Efficient and lightweight, MTCNN is widely used for robust face detection in the wild.
HOW TO USE MTCNN?
The best known possible implementations of MTCNN are the following -
mtcnn(https://pypi.org/project/mtcnn/): implemented to be used with TensorFlow.facenet-pytorch(https://pypi.org/project/facenet-pytorch/): library that exposes a function for using the MTCNN method. To be used with PyTorch.
In this demo, we'll use the TensorFlow one, which is mtcnn.
Let's make a demo to help you get started with MTCNN using mtcnn library.
IMPLEMENTATION
First things first, let's initialize a virtual environment, with -
python3 -m venv .venvNow activate the virtual environment -
source .venv/bin/activate(for bash shell)
.venv\Scripts\activate(for command prompt)
.venv\Scripts\activate.ps1(for PowerShell)
Install Dependencies
.venv/bin/pip3 install opencv-python mtcnn[tensorflow] matplotlib(for Linux/macOS)
.venv\Scripts\pip3.exe install opencv-python mtcnn[tensorflow] matplotlib(for Windows)
(instead of just installing mtcnn alone, as it requires TensorFlow >= 2.12, this external dependency is recommended to be installed automatically along with mtcnn via mtcnn[tensorflow])
Step By Step Code
Note: You must always specify the absolute path of a file when you are specifying it to OpenCV, because in python there is no built in mechanism to detect the
cwddirectly without any manual work. So, relative paths may not work. So beware.
(Just like the previous demo, I recommend you to use jupyter notebooks as your code editor)
Now start importing the necessary modules -
import cv2
from mtcnn.mtcnn import MTCNN
import matplotlib.pyplot as plt
Define A Class to Detect Faces Using MTCNN
class FaceDetector:
    def __init__(self):
        self.detector = MTCNN()

    def detect_faces(self, image_path):
        image = cv2.cvtColor(cv2.imread(image_path), cv2.COLOR_BGR2RGB)
        faces = self.detector.detect_faces(image)
        return faces, image

    def draw_faces(self, image, faces, keypoints=[]):
        for face in faces:
            x, y, width, height = face['box']
            cv2.rectangle(image, (x, y), (x + width, y + height), (0, 255, 0), 2)

            if keypoints:
                for keypoint in keypoints:
                    cv2.circle(image, (keypoint),1, (0,255,0), 2)
        return image
what the detect_faces() method does is basically, -
Loads the image using OpenCV.
Converts it from BGR (OpenCV’s default) to RGB (what MTCNN expects).
Uses MTCNN to detect all faces in the image.
Output: Returns a list of detected
faces(each containing bounding box and keypoints) and the image itself.
Each
faceis a dictionary with keys'box'(x, y, width, height),'confidence'and'keypoints' (a dictionary with keys - 'left_eye', 'right_eye', 'nose', 'mouth_left', 'mouth_right').
And draw_faces() basically -
Draws a green rectangle around each detected face.
If you pass in
keypoints, it draws small green circles at those points.
Output: Returns the image with boxes (and circles) drawn on it.
We can then display or save this image to see the results visually.
We will now use this class to detect faces.
Define a Function to Render The Images With Detected Faces
def render_detected_face(img_path):
    detector = FaceDetector()
    faces, image = detector.detect_faces(img_path)
    keypoints = []
    for face in faces:
        keypoints.extend(face['keypoints'].values())
    image_with_faces = detector.draw_faces(image, faces, keypoints)
    plt.imshow(image_with_faces)
    plt.axis('off')
    plt.show()
This function is just for easier testing with different images. It takes an image path, detects all faces in it using MTCNN, and automatically draws both bounding boxes AND facial landmarks/keypoints (eyes, nose, mouth corners) — then displays the result.
It does everything: detect → draw → show.
Now time to test with images -
img1_path = r'/home/deba/notebooks/forblogs/Emma.jpg'  # Replace with your image path
img2_path = r'/home/deba/notebooks/forblogs/3-men-images.jpg' # Replace with your image path
render_detected_face(img1_path)
render_detected_face(img2_path)With the images I used, the output is the fig. 1 from the image below.
From fig. 1 we can understand the mtcnn made some mistakes in case of Image 1 and detected some dots and marks too as valid faces, which is incorrect.
So, what can you do?
The thing is, when we detect faces with mtcnn, we get a nice attribute called confidence in the output, if you remember. It is really useful, because it helps us to filter out potential detections that are not faces.
Let me show you how. We can modify the function that renders faces, to include only the best faces using a filter before rendering them. Look below the modified new function. -
def render_best_faces(img_path):
    detector = FaceDetector()
    faces, image = detector.detect_faces(img_path)
    best_faces = list(filter(lambda f: f['confidence'] > 0.95, faces)) # This is crucial change here
    keypoints = []
    for face in best_faces: # we iterate through the best faces now
        keypoints.extend(face['keypoints'].values())
    image_with_faces = detector.draw_faces(image, best_faces, keypoints)
    plt.imshow(image_with_faces)
    plt.axis('off')
    plt.show()
Now test again with -
render_best_faces(img1_path)
render_best_faces(img2_path)
Now in fig. 2 you can see that only the real face is bounded with a box with pointed facial landmarks for Image 1. (Didn't include Image 2 because it was already accurate before and remained the same after applying the filter)
How cool is that!
Now, if you are interested, you can apply automatic face cropping with the best faces detected. Face cropping with mtcnn is largely helpful in scenarios where you are preparing a face image dataset for training or fine-tuning machine learning/deep learning models. In that scenario, proper preprocessing of image dataset is crucial. Because it improves the training accuracy of your model by keeping only the data (face) in the dataset you want to feed your model.
For that purpose, we will need to define a face cropping function that will crop the image and create a new by taking and using the x, y coordinates and height-width of the bounded box region of best face.
def crop_best_faces(img_path):
    detector = FaceDetector()
    faces, image = detector.detect_faces(img_path)
    best_faces = list(filter(lambda f: f['confidence'] > 0.95, faces))
    cropped_faces = []
    for face in best_faces:
        x, y, width, height = face['box']
        cropped_face = image[y:y + height, x:x + width]
        cropped_faces.append(cropped_face)
    return cropped_faces
This is how you use it -
cropped_faces_img1 = crop_best_faces(img1_path)
cropped_faces_img2 = crop_best_faces(img2_path)

for faces in [cropped_faces_img1, cropped_faces_img2]:
    for j, face in enumerate(faces):
        plt.subplot(1, len(faces), j + 1)
        plt.imshow(face)
        plt.axis('off')
    plt.show()
You can see the cropped faces of the input images in the fig. 3 of image shown above.
So, that's pretty much all of it. A huge congrats to you if you have read up to this point so far.
CONCLUDING
Face detection has come a long way from the days of Haar Cascades.
With MTCNN, we not only just detect faces—but also able to refine, align, and prepare them for high-quality downstream tasks like facial landmark recognition and dataset creation.
The ability to filter detections by confidence and crop faces with precision makes MTCNN a powerful weapon for developers working in real-world scenarios.
So go ahead—experiment, tweak, and push the boundaries of what your models can see. The face of your next project might just be clearer than ever.